My Sister’s First Stereo - Redesigning a Bose AV321
As brothers and sisters typically do, my little sister shares quite a few similarities and interests as I do. Being someone who loves to share the love of music and what high end audio has to offer, I would be a bad brother to not at least introduce her to the experience of better sound.
It was September, and I had recently been given a Bose AV321 stereo system without the center control box. Like most audiophiles, I tend to shy from Bose since products from this era were mostly marketing instead of providing good respectable full range sound. This system was no exception with the bass cabinet cutting off above what decent bookshelf speakers can accomplish (46Hz), and having an entire band of musical information missing in the mid-bass section (203-279Hz) as measured here. That being said, there were still some positives to the the design and could be a great jumping off point for a first stereo. The satellites were heavy and well damped, with some foam feet added there was no audible vibration transfer heard or felt transferred to the floor, and the angled drivers provide a wide dispersion into the room, this would provide a nice image with disappearing speakers and a wide “sweet spot”. The bass module left some to be desired, but it required quite a bit of work just to be operational again, so that would be my main focus on this component.
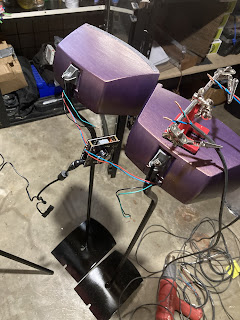
In the first planning stages of this build I of course wanted to go over the top and laid out an elaborate plan of turning the satellites into two way speakers with the addition of a dome or planar tweeter with some decent quality crossover networks. This quickly became a bit too costly for the funding I had available, not to mention the time crunch and a lack of a proper calibration microphone would leave me to using my ears only for the design process. I instead opted to run the satellites as full range drivers without a network and the only crossover component being the low pass filter built into the amplifier module of the Acoustamass commode. The early 2000s Bose grey had to go as well, being replaced with a color shifting purple with gold fleck, paired with silver glitter transparent cloth for the grilles. The white bases and Acoustamass cabinet were painted gloss black to match the new aesthetic.
Once the satellites were painted, it was time to actually get them working. Bose likes to use proprietary connectors so that their products are only used and compatible with Bose brand products. This forces a loyal customer for products and of course repairs, as the technical manuals for these are hard to find. The original speaker cables comprised a single unit with integrated plugs for the speakers and joined at the source end with a VGA type connector. The original logic for this was independent control of the 2 drivers of each satellite for a semi-surround sound with either a sound delay or a sort of cross talk elimination with out of phase delayed audio signals common in many sound bars today.
I cut the end off and used them for testing, but needless to say the VGA cables had to go. Besides being hideous, I had found a few wear spots that would have shorted the channels in time. I made a new set of cables out of some spare lengths from other builds. The red and black twist looked good and would make connecting them easy for my sister starting out.
I ended up wiring the two drivers in series, in phase. Testing the impedance of the single drivers showed around 3 ohms a piece, and that is lower than the amplifier would like to see. Wiring in series adds the sum of the two, and with the speaker cables both sides were an average of 6.5 ohms. The amp is rated for 4-8 ohm load so this lands nicely in the middle to allow for variations.
I also experimented with flipping the polarity of the outward facing drivers as an attempt to reduce room interactions, but it caused more placement and cancellation issues than it was worth. I was happy with how it was sounding and performing, so I went ahead and assembled the front covers to complete the satellites.
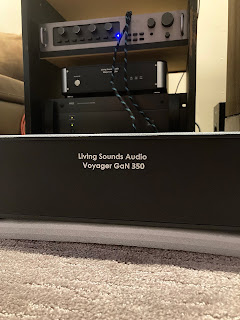
Now it comes down to the choice of amplifier. The small drivers don’t need that much power, and for a first amplifier I was wanting something with easy connectivity. I found this small Wuzhi Bluetooth class D chip amplifier that had great reviews. The connections are clearly marked and the only control is the center volume knob. The only tool needed was an included Philips head screwdriver.


The only issue with the amp is that it is so small. The power supply to feed it was double the size of the entire unit. A small amplifier with a big power supply and mass of cables wasn’t going to intrigue anyone into the audio hobby so I opted to build a base out of a scrap hobby board to conceal the power supply. This also ensures the safety and breathing room of the amplifier. To match the rest of the system the top was painted in the same color shifting purple with a layer of clear coat. The sides and the screwdriver holder I left natural wood with a generous application of lemon oil.
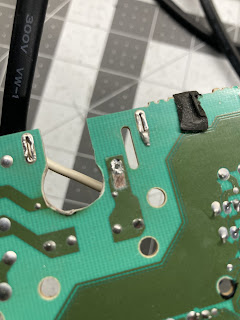
Lastly, the Acoustamass cabinet needed repair. Both the power connector and the 15 pin input were broken on the board with bad burn damage from the resulting arcing on the power connector. There was no reusing it, so I wired the power cord directly to the board after removing all of the damaged portions.
The 15 pin connector also came out, as I did not have this cable or the center control center that fed this. Unfortunately the amplifier I was using for this project did not have a line out. The original advertisement shows a line out for active speakers, but I seemed to miss the part about automatic input AND output switching. When it detects that you have inserted the 3.5mm plug, the speaker output is automatically disconnected, and without the ability to reprogram the chip I wasn't getting around this feature.
My solution was to use a line out converter that takes the high level output from the amplifier and converts it to a low level for subwoofer type inputs. I had a spare laying around from my last subwoofer install that would work perfectly with some modification. The newly repaired Bose amplifier board was also the power supply for the central control unit, so it could easily feed the 12V needed for the converter. The input for the Bose was a mono signal compared to the stereo that the LOC provided, this is easily solved with some resistors to convert the converter to mono. Essentially a whole lot of conversion going on here just to get a single input signal for the bass cabinet.
The tricky part now was getting the Bose amplifier to actually play sound. After hours of lengthy research and finally stumbling upon a technicians repair manual, I found out that I needed to feed some voltage back to one of the pins of the 15 pin connector in order to unmute it. This was probably a simple circuit tied to the power switch on the control unit, I bypassed it with a couple of resistors as recommended for a test cable in the manual.
For the input I hard wired in a set of RCA cables that would connect the Wuhzi amp to the LOC. After a series of testing I realized that I would not be able to use both channels with the converter and this single chip amp. Connecting both channels it would act like there was a shorted connection across the terminals, so I compromised and only used one channel for the input until I can perhaps find a second cabinet or better solution in the future. Altogether the system sounded very respectable for what it was, so it was time for the finishing touches to wrap up the project and this gift. The connection between the amplifier and module is a single RCA cable mounted to the baseplate. The Acoustamass module received a new coat of shining purple paint with gloss black for the actual cabinet, and I finished off by sealing all of the paint with clear coat.
Being an audiophile, there is always room for improvement and this system is no exception. There are glaring faults and many things that can be done better. Despite these glaring flaws, this refreshed system doesn’t disappoint. The simple low distortion chip amp coupled with crossover-less full range drivers creates a very wide soundstage with decent imaging. The main opinion that matters here is that of my little sister, and I am very happy to hear that she has fallen in love with it. I was 19 when I learned what it meant to be an audiophile and always wished that I had found out sooner. This is a gift I can pass on to the one who follows in my footsteps while blazing her own path, learning many things quicker and earlier than I ever did. I have a feeling these will be an ongoing project with upgrades in the future as I teach her about audio, physics, and engineering through the magic of music.


Comments
Post a Comment